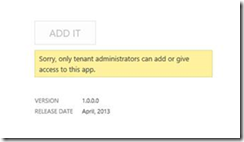
Only tenant administrators can add or give access to this app

A quick note about a problem I ran into the past few days. When installing a SharePoint Hosted App on a on premise machine I get the error: Only tenant administrators can add or give access to this app.
image

The SharePoint Hosted App needs User Profiles Read Permissions but other Apps without any extra permission install without any problem. If you encounter this problem be sure you have configured your App Store and tenant information using the following powershell commands:

Set-SPAppDomain "machinename.domain"

Set-SPAppSiteSubscriptionName -Name "app" -Confirm:$false

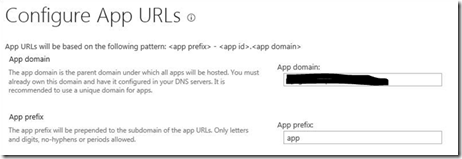
This can also be achieved by setting the App Url’s:

image

This fixed the problem. Hopefully this blog will help you as well.

Tagged with: ,
Posted in SharePoint 2013, SharePoint Hosted

Building SharePoint 2013 MVVM Apps – The Bucket List

As a .Net developer I’ve spent most of my time building ASP.Net,  MVC JQuery websites and WCF services. SharePoint 2013 is therefore relatively new to me. As a crash course I’ve dedicated my TechDays 2013 to all the session about App Development for SharePoint. One session was really good and can be found here: http://bramdejager.wordpress.com/2013/03/14/microsoft-techdays-2013/

Back at the office I was assigned to a SharePoint team in which we needed to deliver multiple Apps. This article will describe the creation of an App called: “The Bucket List” and will show you how you can use the MVVM pattern in your SharePoint Apps.

Setting up your Development Environment and general information about SharePoint 2013 is as much left out of this article.

Requirements for the Bucket List App

  • A user must be able to Add, Edit and Delete his Bucket List items
  • The user must only see and edit his own list items
  • The App must be SharePoint hosted
  • The App must be available as an App Part

Create the SharePoint Hosted project

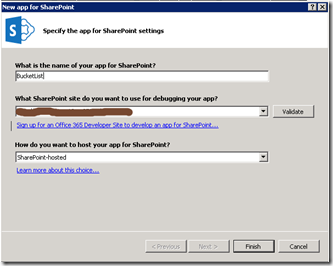
To start with the development I created the BuckedList SharePoint App:

image

After this you need to think of what kind of services or permissions this app will need to have in order to work with the hosting website. I could not come up with one so if you know one please tell me.

Add the List

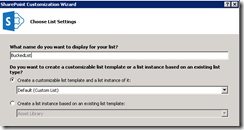
To hold the bucket items a list is added to the App. The list will only have two field to hold the information. The “Title” field and the Boolean to indicate your bucket list item is done.

image  image

Setting up the SecurityBits

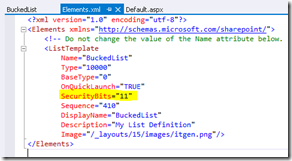
One of the requirements is that the user is only allowed to see and edit his own list items. This can be achieved by setting the SecurityBits of the ListTemplate section in the Elements.xml. By default these are set to 11. Which means that:

  • Users can read all items
  • Users can edit all items.

image

To fix this, the security digits are set to 22, which means:

  • Users can read only their own items
  • Users can edit only their own items.

One downside of this scenario, users with the ManageLists permission can read and edit all items, regardless the value of the SecurityBits attribute. Also read : http://msdn.microsoft.com/en-us/library/ms462947.aspx

To overcome this issue the data retrieved from the list in the App will be specifically requested for the current user. So users with ManageLists permission will also see only their own bucket list items.

Adding the Client Web Part (Host web)

The App must be available as an App Part. By default a default.aspx page is added to the Pages Module of the SharePoint Solution. And this page will be shown when you run your App. But for this solution I need to have my App to run next to other apps on a page in SharePoint.

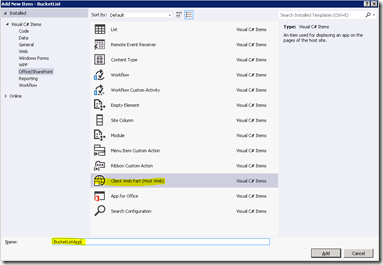
Looking at AutoHosted en Provider Hosted Solutions you will see they are allowed to be framed and available as App Part. To get this done in the SharePoint Hosted App we first need to add a Client Web Part. I will call it the BucketListApp.

image

On creation of the App it adds a new page, the BuckectList.aspx. The AllowFraming is added automatically on top of the page.

image

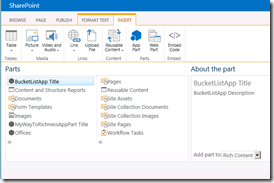
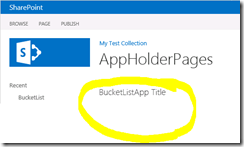
When running the solution it will show the page. And the App Part it self can be inserted in a page. After insert it will run in its own IFRAME.

image image

Going KnockOut

Since my BucketList application is a single page application (SPA) I find it the best way to build those kind of Apps with KnockOut. In this way I can separate my html and styling from logic. In other words keep the view out of my viewmodel. KnockOut will do the databinding of my view to my viewmodel. If you are new to KnockOut take some time to visit their site. Also this article recently published about the KnockOut SPA template, part of the Web Tools 2012.2 release, is a must read.

image

Install knockout.js using the Manage Nuget Packages and add the reference to the JavaScript in your aspx.

At this point you have opened the gate to MVVM!

  • Model
    The Model is the SharePoint List and is retrieved as JSON by the ViewModel
  • ViewModel
    The ViewModel is the JavaScript file where we perform all CRUD operations
  • View
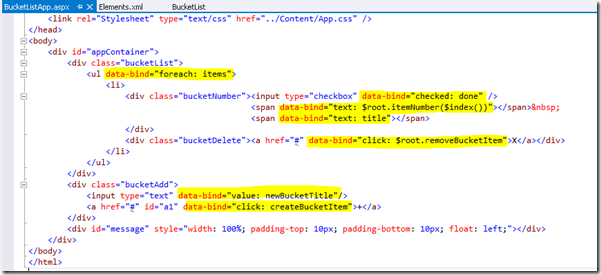
    The View is the aspx file in where styling is done. Databinding from the View to the ViewModel is done by KnockOut using the data annotations.

The View will look something like this:

image

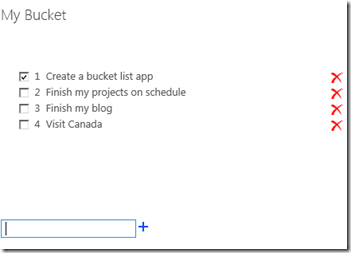
The List to be displayed is called Items. This is a knockout observable array. Which means that changes to the collection are directly visible in the html page. The App will look like this:

image

The ViewModel will hold all the plumbing, to retrieve the information from the SharePoint List and fill the items in the observable array.

'use strict';


// The top bucketList ViewModel with its observable collection and properties.

var bucketListViewModel = function () {

    // The viewmodel properties.

    var self = this;

    self.items = ko.observableArray([]);

    self.newBucketTitle = ko.observable("Type you new bucket item.");


    // Property that holds the name of the sharepoint list.

    self.sharePointListName = "BucketList";


    // The viewmodel operations.

    // Initialize the viewmodel.

    // Load all bucket list items and fill the observable array of links.

    self.init = function () {

        // Set up a list and CAML query to retrieve the items from sharepoint.

        var list = web.get_lists().getByTitle(self.sharePointListName);

        var camlString =

            "<View>" +

                "<ViewFields>" +

                    "<FieldRef Name='ID' />" +

                    "<FieldRef Name='Author' />" +

                    "<FieldRef Name='Title' />" +

                    "<FieldRef Name='Done' />" +

                "</ViewFields>" +

                "<Query>" +

                    "<Where>" +

                        "<Eq><FieldRef Name='Author' LookupId='TRUE' /><Value Type='Integer'>" + user.get_id() + "</Value></Eq>" +

                     "</Where>" +

                 "</Query>" +

                 "<RowLimit>10</RowLimit>" +

             "</View>";


        var camlQuery = new SP.CamlQuery();

        camlQuery.set_viewXml(camlString);

        var itemsFromSharePoint = list.getItems(camlQuery);

        context.load(itemsFromSharePoint, "Include(Title, ID, Author, Done)");


        // Execute the query with all the previous  

        // options and parameters.

        // On succes set the retrieved items in the observable collection.

        context.executeQueryAsync(

            function (sender, arg) {


                // Fill the items observable array.

                var enumerator = itemsFromSharePoint.getEnumerator();

                while (enumerator.moveNext()) {

                    var item = enumerator.get_current();


                    // Fill the array.

                    self.items.push(new bucketItem( item.get_item("ID"),

                                                    item.get_item("Title"),

                                                    item.get_item("Done")

                                                 ));

                }


                // Bind the viewModel to the view.

                ko.applyBindings(self);


            }, onFailedAction

        );

    }


    // Item number funcion to add 1 to the current item nummer.

    self.itemNumber = function (index) {

        return index + 1;

    }


    // Create a bucket item.   

    self.createBucketItem = function () {

        // Get the sharepoint list.

        var list = web.get_lists().getByTitle(self.sharePointListName);


        // Create new bucket item.

        var itemCreateInfo = new SP.ListItemCreationInformation();

        var listItem = list.addItem(itemCreateInfo);


        // Set item values and save the bucket item in the sharepoint list.

        listItem.set_item('Title', self.newBucketTitle());

        listItem.update();


        // On succes push the item in the observable collection.

        context.executeQueryAsync(

            function (sender, args) {

                self.items.push(new bucketItem(listItem.get_id(),

                                               listItem.get_item("Title"),

                                               false

                                                )

                                    );

        },

        onFailedAction);

    }


    // Edit a bucket item.   

    self.editBucketItem = function (item) {

        // Get the sharepoint list.

        var list = web.get_lists().getByTitle(self.sharePointListName);


        // Update the item because the id is set.

        // Retrieve the exsisting item from sharepoint and start editting.

        var editItem = list.getItemById(item.id);


        // Load the editTiem into the sharepoint context.

        context.load(editItem);

        context.executeQueryAsync(

            function (sender, args) {

                // Set item values and save the item in the sharepoint list.

                editItem.set_item('Done', item.done());

                editItem.update();


                // On edit succes, nothing needs to happen at this point.

                context.executeQueryAsync(

                    function (sender, args) {

                    },

                    onFailedAction);

            },

            onFailedAction);


    }


    // Remove the bucket item from sharepoint list and from the collection.

    self.removeBucketItem = function (item) {

        // Remove the item from the sharepoint list.

        var list = web.get_lists().getByTitle(self.sharePointListName);

        var listItem = list.getItemById(item.id);

        listItem.deleteObject();


        context.executeQueryAsync(

            function (sender, args) {

                // Remove bucket item  from observable on succes of async delete from sharepoint list.

                self.items.remove(item);

            },

            onFailedAction);

    }


}


// A BucketList Item class to hold item information information.

var bucketItem = function (id, title, done) {

    var self = this;

    self.id = id;

    self.title = title;

    self.done = ko.observable(done);


    saveChanges = function () {

        return viewModel.editBucketItem(self);

    };


    // Auto-save when done changes

    self.done.subscribe(saveChanges);


}
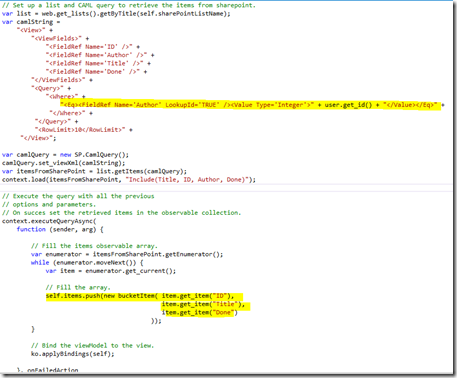
Within the init function a CAML query is requested to retrieve the list items for this App. The items are targeted to the Author, so you will see only your bucketlist items. After retrieving the items they are added to the observable array:

image

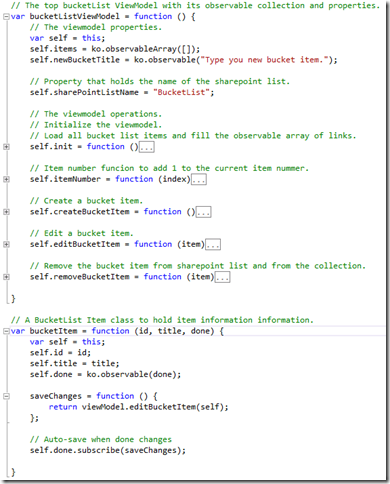
The other operations are also available in the ViewModel and are shown here:

image

Hope you will find this blog helpful.
The complete solution can be downloaded here from CodePlex.

Tagged with: , , , , , ,
Posted in Knockout, MVVM, SharePoint 2013, SharePoint Hosted, SPA

Automatically add references and content to the WIX installer

In my previous post I created a WIX installer with the WizWix. The downside is that you need to add all the references by hand. And when new references are added you need to know this before you can build the installer.

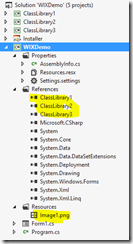
In the WixDemo project I have added three new class libraries and an image. The class libraries are added as reference and the image is set to Content

image image

In the previous post I started with WizWix wizard. But now I want the project output to be added automatically to the Installer:

Adding Binaries with the Heat Harvest Tool

Add a pre build event to harvest all binaries from the project output of the WixDemo project. This is done by the Heat Harvest Tool.

call "C:\Program Files (x86)\WiX Toolset v3.7\bin\heat.exe" 
dir "$(TargetDir)." -var var.WixDemo.TargetDir -dr APPLICATIONFOLDER
-cg Binaries -ag -scom -sreg -sfrag –srd
-o "$(SolutionDir)Installer\$(ProjectName).Binaries.wxs"
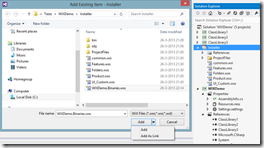
This will create a wixdemo.binaries.wxs file which you can add as a Link in your installer project.
image
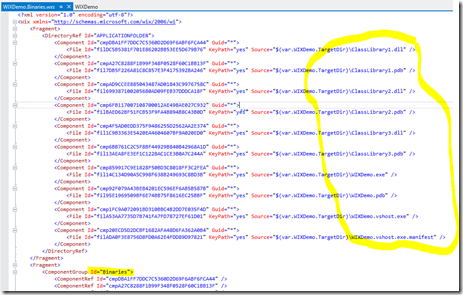
The WixDemo.Binaries.wxs holds all binaries from the WixDemo output directory:
 
image
 
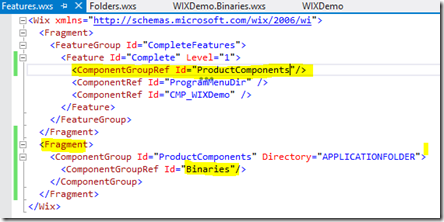
In the installer directory we now need to modify the Features.wxs file. In the file a Fragment is added which references to the Binaries section in our WixDemo.Binaries.wxs
 image

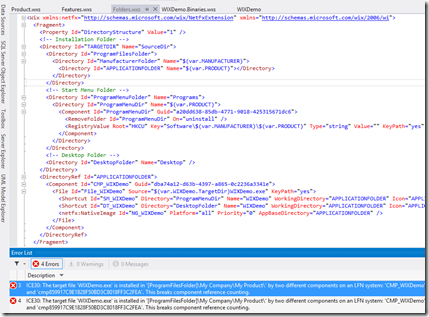
When you build the installer project at this point you will get all kind of ICE30 errors. The problem is that the WixDemo.exe exists in the Folder.wxs and in the WixDemo.Binaries.wxs.

image

Filter the Binaries file

The Folder.wxs holds the shortcut and folder information for the WixDemo installer. This is something you want to keep. Therefore the WixDemo.exe needs to be removed from the WixDemo.Binaries.wxs file. Taking a closer look at this file I also want to skip pdb files as well. This is done by adding an xslt filter file to the build event.

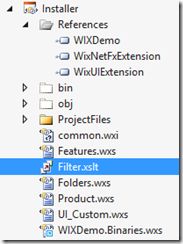
First add an XSLT Filter file to the installer directory:

image

The Filter holds the following search key’s:

<?xml version="1.0" encoding="UTF-8"?>
<xsl:stylesheet version="1.0"
xmlns:xsl="http://www.w3.org/1999/XSL/Transform"
xmlns:wix="http://schemas.microsoft.com/wix/2006/wi">
<xsl:output method="xml" indent="yes" />
<xsl:template match="@*|node()">
<xsl:copy>
<xsl:apply-templates select="@*|node()"/>
</xsl:copy>
</xsl:template>
<xsl:key name="service-search" match="wix:Component[contains(wix:File/@Source, '.pdb')]" use="@Id" />
<xsl:key name="service-search" match="wix:Component[contains(wix:File/@Source, '.xml')]" use="@Id" />
<xsl:key name="service-search" match="wix:Component[contains(wix:File/@Source, '.dll.config')]" use="@Id" />
<xsl:key name="service-search" match="wix:Component[contains(wix:File/@Source, '.vshost.exe')]" use="@Id" />
<xsl:key name="service-search" match="wix:Component[contains(wix:File/@Source, 'app.confing')]" use="@Id" />
<xsl:key name="service-search" match="wix:Component[wix:File/@Source = '$(var.WIXDemo.TargetDir)\WIXDemo.exe']" use="@Id" />
<xsl:template match="wix:Component[key('service-search', @Id)]" />
<xsl:template match="wix:ComponentRef[key('service-search', @Id)]" />
</xsl:stylesheet>

This will remove all pdb, xml, dll.config, vshost.exe en the WIXDemo.exe file from the Binaries file. There is only one thing we need to add extra to the heat pre build event:

-t "$(SolutionDir)Installer\Filter.xslt" 

The complete pre build event for the binaries is now:

call "C:\Program Files (x86)\WiX Toolset v3.7\bin\heat.exe" dir "$(TargetDir)."  -t "$(SolutionDir)Installer\Filter.xslt" -var var.WIXDemo.TargetDir -dr APPLICATIONFOLDER -cg Binaries -ag -scom -sreg -sfrag -srd -o "$(SolutionDir)Installer\$(ProjectName).Binaries.wxs"

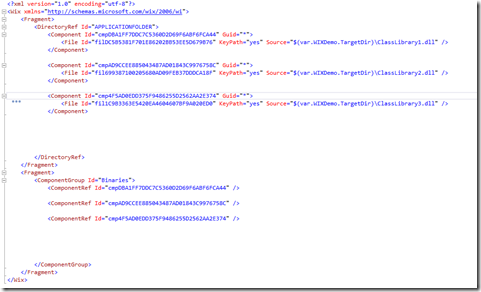
After building the installer the WixDemo.Binaries.wxs file looks like this:

image

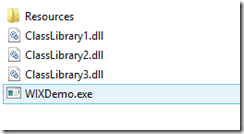
Installing the MSI will show that the binaries and exe are placed in the install directory:

image

Adding Content

Finally I the content (image) needs to be installed as well. Add the following line to the pre build event:

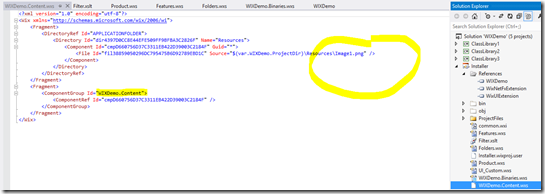
call "C:\Program Files (x86)\WiX Toolset v3.7\bin\heat.exe" project "$(ProjectPath)" -directoryid APPLICATIONFOLDER -pog Content -ag -scom -sreg -sfrag -o "$(SolutionDir)Installer\$(ProjectName).Content.wxs"

This will create an WixDemo.Content.wxs file you will need to Add As Link to your Install Project.

image

All you need to do now is add the WIXDemo.Content to the Fragment in the Feature.wxs file:

<Wix xmlns="http://schemas.microsoft.com/wix/2006/wi">
<Fragment>
<FeatureGroup Id="CompleteFeatures">
<Feature Id="Complete" Level="1">
<ComponentGroupRef Id="ProductComponents"/>
<ComponentRef Id="ProgramMenuDir" />
<ComponentRef Id="CMP_WIXDemo" />
</Feature>
</FeatureGroup>
</Fragment>
<Fragment>
<ComponentGroup Id="ProductComponents" Directory="APPLICATIONFOLDER">
<ComponentGroupRef Id="Binaries"/>
<ComponentGroupRef Id="WIXDemo.Content"/>
</ComponentGroup>
</Fragment>
</Wix>

After installing this new installer you will see the resources directory and image in the installation directory:

image image

Conclusion

Now you have best of both worlds. A nice WIX installer structure with Feature, Folder and Product wxs files all created in the first place by the WizWix. And next to that you do not need to worry about adding references and content to your installer. This is done by the Heat Harvesting Tool. The project and source code can be found on CodePlex!

Tagged with: , , , ,
Posted in Heat, Visual Studio 2012, WIX

Creating A WIX installer in VS2012

In Visual Studio 2012 the msi installer is history. Personally I don not find this the best decision. I have tried the InstallShield alternative but I could not use this due to 2 reasons:

  1. Absolute paths to program icons. Not really working if you are in a team working with TFS
  2. Primary Output did not refresh. Building a new installer left me with old dll’s

Having these issues I had to decide, investigate them or search for alternatives. I ended up with WIX. I created an MSI installer within hours. The following steps describe how you create your own installer with WIX for a Windows Form Application.

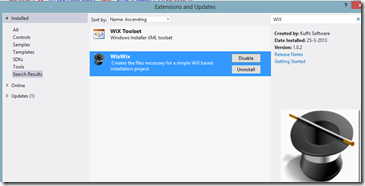
  • Install the WizWix and WIX ToolSet from Tools –> Extensions and Updates
    WizWix is a wizard to add references to your project and create shortcuts to your executable

image

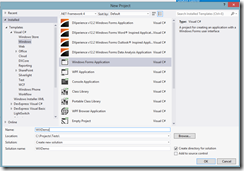
  • Next (after several restarts of VS2012) create a WIndows Forms Application

image

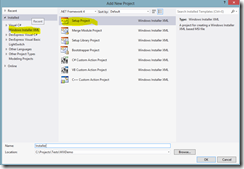
  • Add an WIX installer project to the solution

image

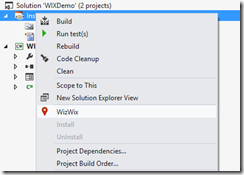
  • Right Click the Installer Project and select the WizWix Wizard

image

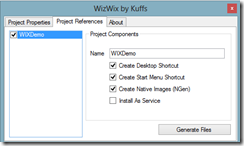
  • Select the references tab and select Windows Forms Project

image

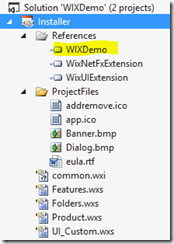
After generate files all WXS files are created. and the WIXDemo project is added as reference to the installer project.

image

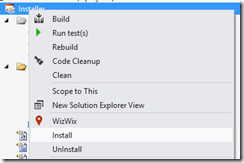
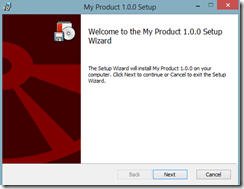
This is a great job done by WizWix. At this point you can Build, Install and UnInstall your Applcation:

image image

Tagged with: , ,
Posted in Visual Studio 2012, WIX

How to install Visual Studio 2012 Premium after 2012 Ultimate RTM

For a month I am using the new Visual Studio 2012 Ultimate RTM and I am impressed. With 4 days to go on the evaluation period I started to feel the pressure. So today I found it was time to downgrade to the Premium version. Well that’s easier said then done.

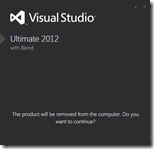
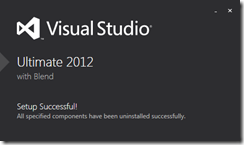
First I had uninstalled VS2012 RTM Ultimate.

imageimage


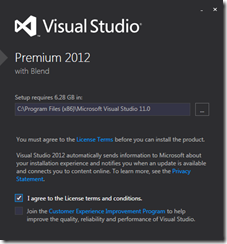
After the uninstall I took my new ISO and I installed the Premium Edition of VS2012.
imageimage

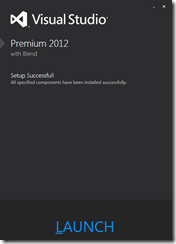
And finally (now I know better) I started the VS2012 Premium Edition. By pressing Launch.
image
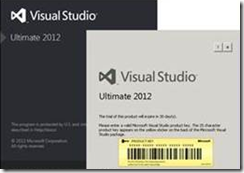
But to my surprise the Ultimate Screen came up which requested me to enter a product key.

An awkward moment and a quest for hours of searching and digging in registry keys I found a file called vs_ultimatecore.msi in: “:C:\ProgramData\Package Cache\{EFA87714-E75A-3BFC-A698-A3AABA5A8A0C}v11.0.50727\packages\ultimatecore”.image

Right Click the vs_ultimatecore.msi and choose to uninstall the ultimate core. And there you go! Activate your Visual Studio 2012 and now you can enjoy your Premium Edition.

image

I hope you’ll find this blog useful and after less time that I had to spend finding the solution for this problem.

Tagged with: , , , ,
Posted in Visual Studio 2012

Virtual Build @Microsoft Amsterdam

arjan2Yesterday I visited the Virtual Build for Windows 8 at Amsterdam. I’ve watched the Keynote presented in Anaheim, California given by Steven Sinofsky. For those who are involved with Microsoft technology, it is a must see!

First of all it was overwhelming. The changes within the User InterfaIMAG1569ce within the Start screen are all in the Windows Phone Metro Style. The Tiles presented on the Start screen show information from the underlying application. I.e. the email Tile will show information about your latest email.

The multi touch experience gives you the ability to “Swipe” tiles and reorder them individually or as a group. Touching the right hand site of the Start screen will open the so called “Charms”.  

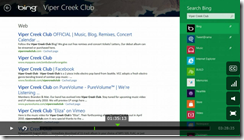
These Charms are Context Aware. When you create you own Metro Style App and tells it to be Searchable, by adding a contract. The Search Charm will be aware of your App!image

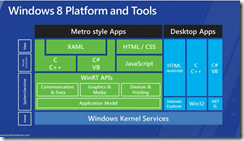
From a developer perspective I say welcome to a complete new developer community who are now able to develop for Windows8. Developers who are capable in creating applications with Html5, css and Javascript are now “Metro Style App Developers”.

image

Visual Studio 2011 Express and Expression Blend are the tools to create the new Metro Style Apps. Expression Blend has a new option to layout your app in HTML en CSS besides the already available XAML way to do it. To publish your apps to the Store you can use Visual Studio 2011.

You can still create Desktop Apps but when creating Metro Style Apps the way to go is XAML or HTML / CSS for the View. From JavaScript we are now able to call native operations on Windows8 using the new WinRT Api’’s. The WinRT is the bridge between native operations and the Windows Kernel. WinRt is build in Windows8 and it is not a framework on top of the OS. This will make it perform much better.

For instance the Grid to show images, which lives in the WinRT, can be called from JavaScript. These kind of operations are unimaginable at this moment .

All Windows Live Tiles in the Start Screen (Mail, People, Calendar, Photos) are build using Html and JavaScript!

At this moment I am downloading the developer preview. I can’t wait to see it in action. Need to get a multi touch device to work with it Smile

Tagged with: , , , ,
Posted in Events